In this guide, we will show you the steps to execute Android ADB and Fastboot commands wirelessly. When it comes to the Android open source ecosystem, these commands stand out as the unsung hero or rather an underrated tool. Among the plethora of tweaks that you could try out, most of them aren’t possible without using these set commands, Well, the first step of unlocking the device’s bootloader is only possible via Fastboot Commands. Along the same lines, flashing custom recovery like TWRP, or booting the device to Recovery, Fastboot, or Bootloader all involves the use of these commands. Well, some of these tasks such as booting to Recovery or Fastboot Mode could well be done without this set of commands. However, there aren’t any universal hardware key combinations for the same. Different devices have entirely different key combinations to boot their devices to the aforementioned mode. On the other hand, these ADB and Fastboot commands stand universal across all Android devices, irrespective of the OEM. Well, it’s not that only the tech enthusiasts make use of these commands. Even the everyday users could try them out to boot their device to stock recovery, install APK files, or remove bloatware from their device. However, in spite of such a long list of commands, it isn’t free from its fair share of issues as well. And most of these issues stem from the USB cables themselves (such as using an incorrect port, preferring USB 3.0 over USB 2.0, and the likes). But what if you could use these commands without involving these messy cables? Well, that is very much a possibility, and in this guide, we will show you how to do just that. So without further ado, here are the detailed instructions to execute Android ADB and Fastboot commands wirelessly.
How to fix ADB Device not found [List of Devices Attached is blank]Detailed Steps to Fix adb is not recognized ErrorFix Unauthorized Device with ADB Commands [3 methods]How to Fix FAILED (remote: Command not allowed)
How to Execute Android ADB Commands Wirelessly
Given below are all the required instructions in separate sections so that it becomes easy to understand. Make sure to follow the guide in the exact same sequence as mentioned
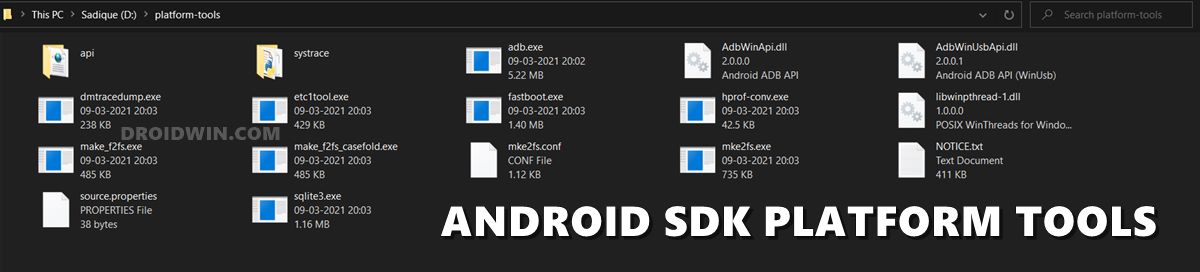
STEP 1: Install Android SDK Tools
First and foremost, you will have to install the Android SDK Platform Tools on your PC. This is the official tool from Google that has all the required ADB and Fastboot binary files. So go ahead, download and install, it would hardly take a minute or so.
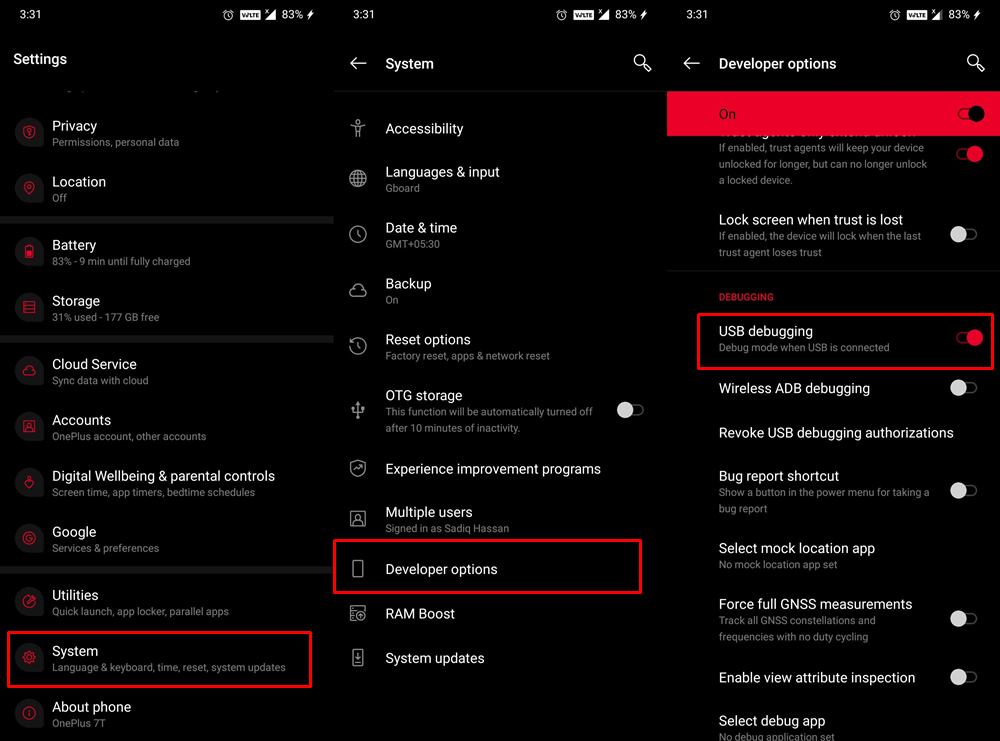
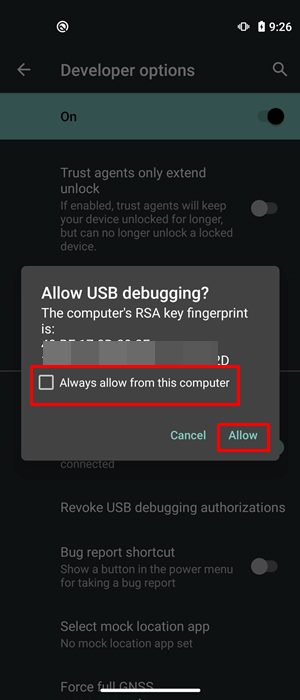
STEP 2: Enable USB Debugging
Next up, enable USB Debugging on your device. This is needed so that your device gets recognized by your PC in ADB Mode. So go to Settings > About Phone > Tap on Build Number 7 times > Go back to Settings > System > Advanced > Developer Options > Enable USB Debugging. [Don’t Miss: How to Enable USB Debugging on a Broken Android Device’s Screen].
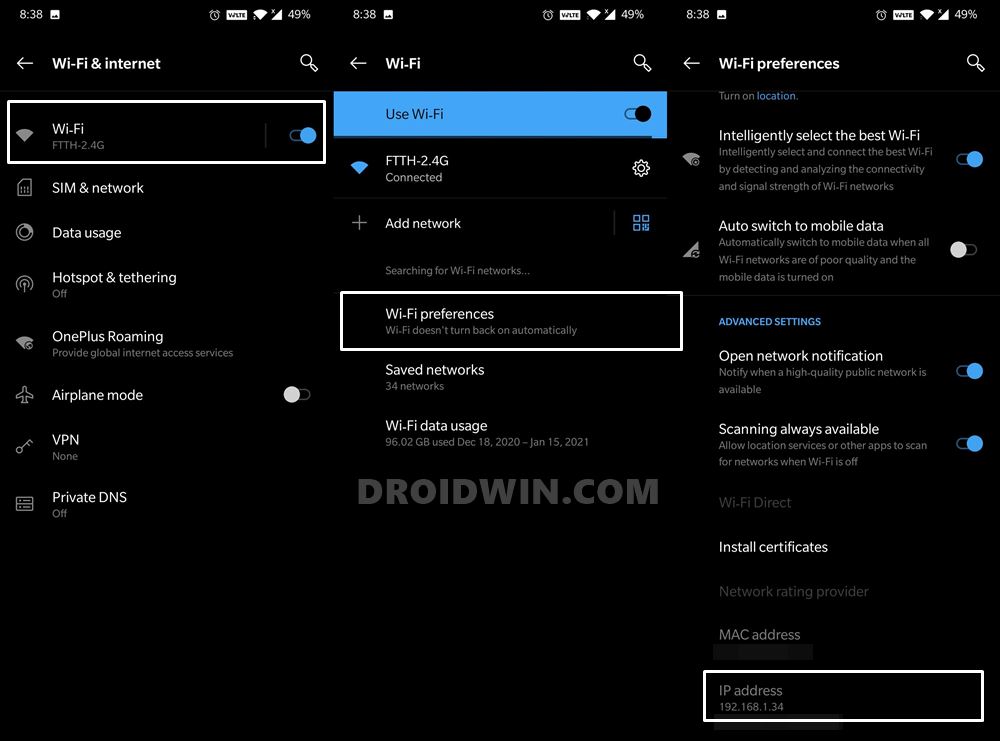
STEP 3: View your Android Device’s IP Address
You should also have to note down the IP address of the wireless network to which your Android device is connected. To check the same, go to WiFi and Internet > WiFi > WiFi Preferences > Scroll to the bottom and you should get the IP Address.
In older Android devices, IP addresses are usually found under Settings > About phone > Status > IP Address. With that said, in my case, it is 192.168.1.34, your’s should be along similar lines. Furthermore, make sure that your Android device and PC are connected to the same WiFi network.
Run ADB Fastboot Commands directly on Android without RootHow to Use ADB and Fastboot Commands on Android Without PCFix fastboot: error: Couldn’t parse partition size ‘0x’How to Fix Android Device stuck in Fastboot Mode
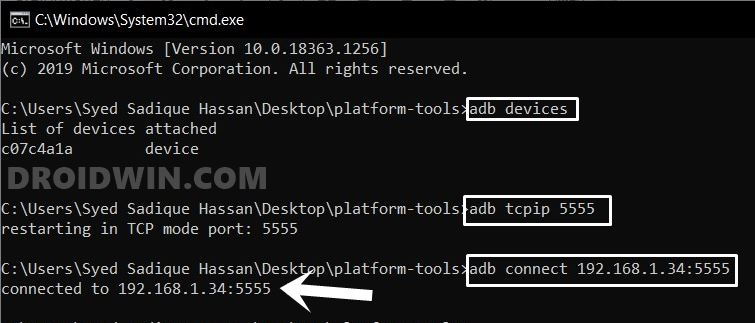
STEP 4: Initiate Android Device’s ADB Connection
STEP 5: Executing Android ADB and Fastboot Commands Without USB
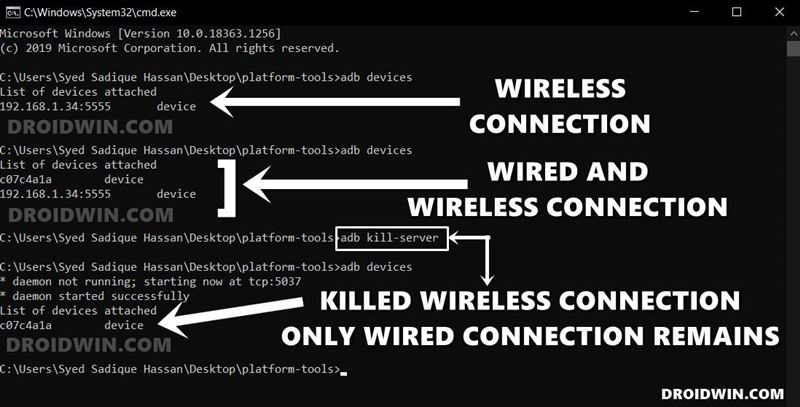
ADB Fastboot Commands Wirelessly: An Interesting Observation
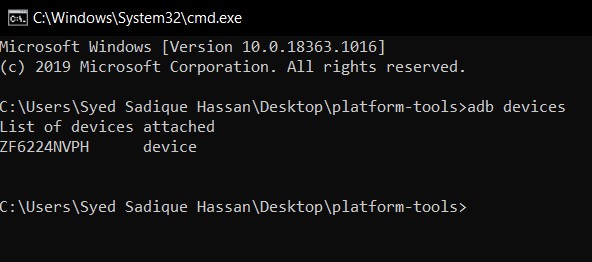
Right after publishing this guide, I tried a little trick. Connected my device to the PC via USB cable and at the same time, had both my device and PC connected to the same network. Since I had already executed all the steps to execute Android ADB and Fastboot commands wirelessly, in practice the CMD window should have displayed two Device IDs after executing the adb devices command. And this is what really happened! I got two different IDs. The first one in the form of an alphanumeric string of characters is associated with the USB connection, while the second one was linked to my IP Address (of the format IP:5555). Even if you close the CMD window and retry with the adb devices you would still get two device IDs, and this might lead to confusion sometimes.
Suppose the internet isn’t up and running in your home, and you would prefer to take the wired route. So you go ahead and use the adb devices command. In doing so, you get two device IDs and you get confused about which one to use. If that’s the case, then you could easily close the wires ADB connection via the following command: Do keep in mind that the next time you wish to execute Android ADB and Fastboot commands wirelessly, then you will have to retry with STEP 1 to STEP 5. So with that, I conclude this intriguing observation as well as this tutorial. If you have any queries, do let us know in the comments section below. We will get back to you with a solution at the earliest.
How to Create and Port TWRP Recovery to any Android DeviceHow to Pass Magisk SafetyNet on Rooted Android 11Root Android 11 via Magisk Patched boot.img (without TWRP)How to Downgrade Samsung from Android 11 to Android 10 (OneUI 3.0 to 2.0/2.5)
About Chief Editor