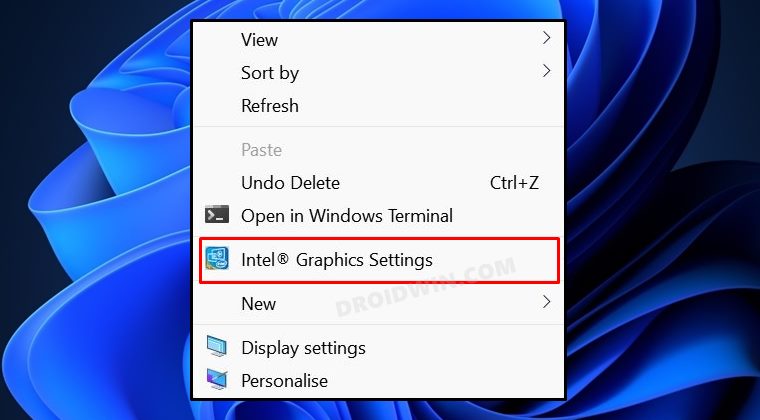
Moreover, it also has all the required information related to the integrated GPU that you could refer to as and when needed. All in all, there are a plethora of reasons as to why you might need to interact with it on a regular basis. Talking about which, you could easily access it from the system tray, via the Start menu, using the designated hotkeys, or from the context menu. Talking about the latter one, it is automatically added as and when the app is installed for the first time. However, for many users, that doesn’t seem to be the case. If you are also in the same boat, then fret not. In this guide, we will show you the two methods to add Intel Graphics Settings to the Windows 11 right-click menu. Follow along.
How to Add Intel Graphics Settings to Windows 11 Right Click Menu
You could add the Intel Graphics settings to the Windows 11 context menu via Registry Editor- using the automatic and manual approach. We have listed both these methods below, along with their perks and risks. Go through both of them and then decide which you are comfortable in trying out. Before starting, we would recommend you take a backup of the registry before making any modifications to it.
For that, open Registry Editor, head over to HKEY_CLASSES_ROOT\Directory\Background\shellex\ContextMenuHandlers, right-click on the ContextMenuHandlers folder, and select Export. Then save it to any location on your PC. If things go wrong, then you could easily restore it by launching this exported registry file. With that out of the way, let’s get started. Proceed ahead at your own risk.
METHOD 1: Automated Approach
In this method, you just need to launch a Registry Editor file and the rest of the work will be done by it in the backend. However, there is generally a risk factor involved in expecting a registry file downloaded from the web. Though we will show you the entire contents of that file before executing it, but if you still have any doubts, you are free to opt for the manual method.
METHOD 2: Manual Approach
The benefit of this method is that you have complete control over this process. On the flip side, it is a tedious process and calls for your manual efforts. So with that in mind, let’s get started. That’s it. These were the two different methods to add the Intel Graphics Settings to the Windows 11 right-click menu. If you have any queries concerning the aforementioned steps, do let us know in the comments. We will get back to you with a solution at the earliest.
How to Remove Intel Graphics Settings from Windows 11 Right Click Menu
if you wish to revert the change and remove the Intel Graphics Settings from the Windows 11 right-click menu, then here’s what you need to do:
UPDATE 1
You will no longer be able to add the Intel Graphics Settings to the Windows 11 right-click menu beginning with version 26.20.100.6618. The reason for the same, according to Intel, is as follows: So what are our options now? Well, you will now have to opt for the traditional methods, such as:
Launch it from the Start Menu.Add it to the System Tray. For that, launch Intel Graphics Command Center > Go to the Settings menu > Enable the toggle next to Systek Tray. Using Shortcut Keys. launch Intel Graphics Command Center > Go to the System menu > Assign the desired hotkeys from the Intel Graphics Command Center section.
Game crashing on 12th Gen Intel Core Processor on Windows 10/11: FixWindows 11 Right Click: How to Get Windows 10 Context MenuHow to Improve Gaming Performance in Windows 11 [15+ Methods]How to Install Windows 11 Built-In Graphics Tool
About Chief Editor